

Why Your Diamond Looks Dull and How to Restore the Sparkle?
A diamond appears brilliant when three things are strong: brilliance (white light returned to your eye), fire (rainbow flashes), and scintillation (sparkle as the stone or light moves). Diamonds have a very high refractive index (≈2.42), so when light can enter through the top, bounce around inside, and exit unobstructed, the stone looks alive.
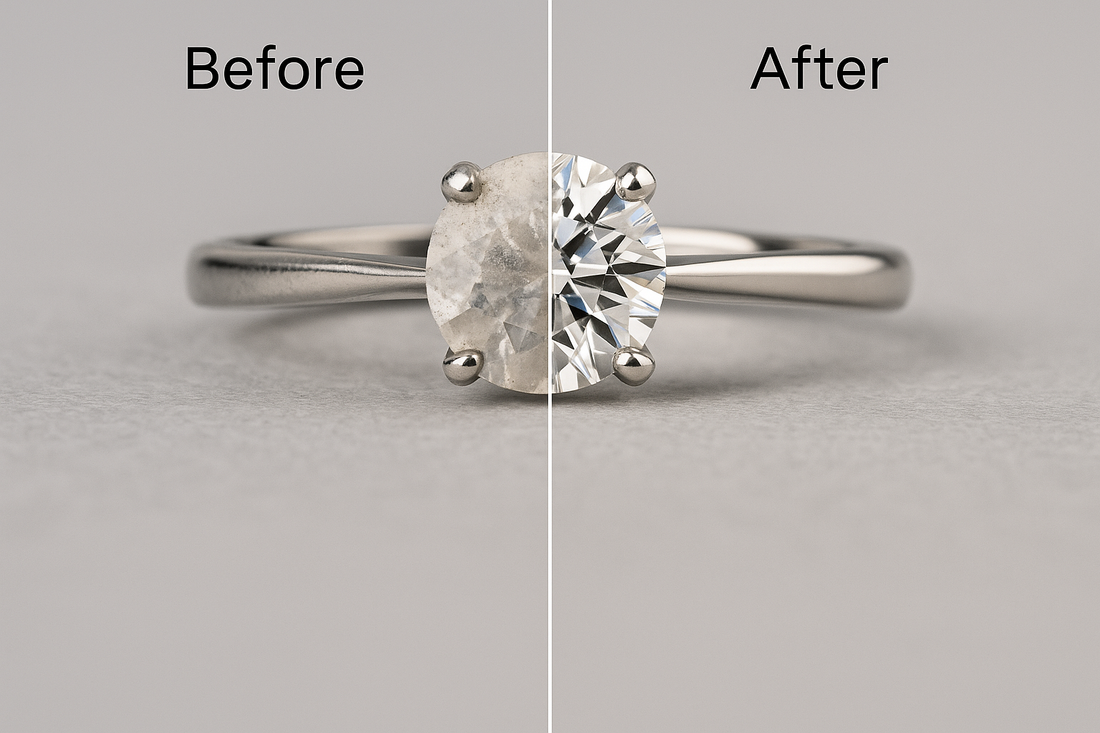
Your diamond looks dull whenever anything blocks or scatters that light:
- A film on the surface bends light the wrong way and lowers contrast.
- Gunk under the stone stops light that should exit through the pavilion.
- Worn metal around the stone makes the frame look grey and drags down perceived sparkle even if the diamond itself is clean.
- Permanent factors such as a poor cut, significant inclusions, or chips scatter light inside the crystal and cannot be solved by cleaning alone.
Origin does not change the optical rules. Lab-grown and natural diamonds sparkle the same when cut and kept clean.
2) Every cause of a dull or cloudy diamond, explained
Skin oils and cosmetics.
Sebum from your fingers, sunscreen, moisturisers, foundation, and hair products leave a thin, stubborn film. This builds up fastest on the crown facets and along the girdle where you touch the stone.
Soap and sanitiser residue.
Hand-wash surfactants and sanitisers often contain conditioners that dry as a haze. You will see a “fog” on the table facet and micro-bubbles along prongs.
Hard-water minerals.
Calcium and magnesium in tap water dry as spots or a whitish crust, especially under the stone where water collects in halos and bezels.
Lint and pocket dust.
Micro-fibres lodge between pavé stones and around prong tips. This dulls contrast and catches more grime.
Metal wear.
White gold’s rhodium plating thins with wear and reveals a warmer yellow tint beneath. The eye reads the whole ring as dull even if the diamond is clean. Micro-scratches on polished metal also make everything look “grey.”
Structural or optical factors.
A diamond with a chip, a surface bruise, heavy clouds/twinning wisps, or leaky proportions (too deep or too shallow) cannot deliver strong light return. Cleaning helps, but only to a point.
Chemical exposure
Repeated chlorine exposure (pools, cleaners) can weaken some gold alloys over time and roughen the finish. Harsh cleaners etch metal and leave the scene looking tired.
3) Diagnose before you clean
Stand near a window and rotate the ring. If sparkle jumps back the moment you wipe the table facet with a clean cloth, the issue is surface film. If it stays hazy until you shine a phone light through the side and look from above, the residue is under the stone. If a thorough clean still leaves a milky zone that does not move with lighting, suspect cut/inclusions or rhodium wear.
If you are looking for more tips then try:
Caring for Your Gold and Diamond Jewelry: Tips from the Experts
4) The safest, most effective at-home clean (five minutes, real results)
What you need. A small bowl, warm water (not hot), one drop of mild dish soap, a very soft baby toothbrush or makeup brush, a second bowl with clean water, and a lint-free cloth.
Step-by-step
- Fill a bowl with warm water and add one drop of soap. Stir gently to avoid foaming.
- Place the ring in the solution for 10–15 minutes. Soaking softens oil and mineral film.
- Lift the ring and brush gently. Focus on the underside of the diamond where most residue hides. Brush along prong bases, beneath the gallery, and under halos.
- Rinse in the second bowl of clean water. Never rinse over an open drain.
- Pat dry with a lint-free cloth, then let the ring air-dry for a minute.
Pro tip for water spots.
Give a quick final rinse in distilled water or a splash of rubbing alcohol to prevent mineral spotting.
Heavy build-up option. For all-diamond pieces (no porous or treated gems), mix 1 tsp clear household ammonia in a cup of water and soak for five minutes after the soap step. Never use ammonia on emerald, opal, pearl, or glued settings.
5) Special guidance by setting type
Halo and micro-pavé. Dirt hides between tiny stones. After soaking, use the soft brush in tiny circles; an interdental brush can help reach channels. Avoid force—if bristles snag, stop. If a stone seems loose, skip cleaning and see a jeweller.
Bezel. Film tends to clamp at the metal rim. Work slowly around the edge after soaking. A longer soak is better than harder brushing.
Cathedral or open gallery. Turn the ring upside down and brush upward into the pavilion through the side openings. That is where most residue lives.
Antique or milgrain. Dirt settles into texture. Use only soft tools and longer soaks; let the water do the work.
6) Ultrasonic and steam: when they help, when they harm
Ultrasonic cleaners use vibration to shake off grime. They are excellent for sturdy solitaires that have been recently inspected for tight prongs. They are risky for:
- pavé halos and micro-prongs,
- antique settings,
- any ring with a known loose stone,
- jewellery with glued components or porous/treated gems.
Steam cleaners blast residue with heat and pressure. They leave a brilliant finish but can drive out debris hidden under stones and reveal loose prongs. If you are unsure, let a professional handle both tools.
7) What never to use (and why)
Toothpaste and baking soda are abrasive and create micro-scratches in metal. Bathroom cleaners, bleach, and chlorine attack gold alloys and rhodium plating. Vinegar and lemon can etch surfaces and leave the ring duller than before. Acetone can damage some treatments and does nothing for mineral scale. Boiling water can soften adhesives in certain settings. Paper towels can scratch polished gold; a soft cloth is safer.
8) When cleaning is not enough
If the stone still looks flat after a proper clean, one of these is likely:
Cut proportions that leak light. Very deep or very shallow stones lose brightness regardless of cleanliness. Upgrading cut quality is the only real remedy.
Significant inclusions or graining. Internal clouds, twinning wisps, or a large feather near the table lowers contrast. Only a different stone or, sometimes, re-polishing can improve it.
Chips and surface bruises. A jeweller can advise on a tiny re-polish that removes the damage with minimal weight loss.
Worn rhodium and scratched metal. A fresh rhodium re-plate and polish can transform the look of white-gold pieces in minutes because the bright frame lets the diamond pop again.
Closed or reflective backs. Some designs trap dirt where you cannot reach. A professional ultrasonic/steam clean may be required, or the design may always need more frequent service.
9) Prevention habits that actually work
Put rings on after skincare and makeup and remove them before gym, spa, pool, dishwashing, or heavy creams. Keep a small ring tray by the sink to avoid washing while worn. Do a quick weekly warm-water clean, and schedule a professional check every 6–12 months for prongs, polishing, and rhodium plating if the piece is white gold. Store jewellery separately in soft pouches so pieces do not scratch each other.
10) White gold 101: rhodium plating and brightness
White gold is naturally warm; jewellers plate it with a thin layer of rhodium for that crisp white look. Normal wear thins this layer, especially on the underside of rings and on prong tips. Signs you need service include a yellowish cast near edges and a general “grey” look in photos. A professional re-plate and polish restores the mirror frame and often makes the diamond look newly brilliant. Many people re-plate every 12–24 months depending on wear; heavy daily wear may need it sooner. If you want a white look without plating, consider platinum for future purchases.
11) Buying for lasting sparkle (if you are still shopping)
Prioritise cut above everything Excellent/Very Good cut grades or well-cut fancy shapes deliver the most light. Choose eye-clean clarity (VS–SI often looks perfect to the naked eye) and a near-colorless grade that suits your metal (warmer colors blend well with yellow/rose gold). Look for low-profile, snag-resistant settings for everyday wear, and ask about maintenance: free cleaning, prong checks, and re-rhodium plating on white-gold pieces. If you are looking for elgance jewellery then you can visit purecarat's best collection
Why Does My Diamond Look Cloudy?
Natural Inclusions – tiny internal flaws that affect brilliance.
Residue Build-up – oils, soap, and lotions making diamonds look hazy.
Poor Cut Quality – even a high-clarity diamond can look dull if poorly cut.
Sunlight Effect – why some diamonds look cloudy in direct sunlight due to reflection and refraction issues.
3. Cloudy Diamond vs. Clear Diamond (with Pictures/Examples)
Visual differences between a cloudy diamond and a clear one.
How inclusions affect transparency.
The role of diamond grading (clarity, cut, polish).
4. Why Does My Diamond Look Cloudy All of a Sudden?
Build-up of dirt and grease.
Changes in lighting conditions (sunlight, artificial lights).
Daily wear impact – skin oils, cosmetics, and dust.
When to suspect structural clarity issues.
5. How to Clean a Cloudy Diamond at Home
Basic cleaning method – warm water, mild dish soap, and soft brush.
How to make diamonds sparkle at home – soaking, gentle scrubbing, and drying.
Safe household remedies:
Cleaning with vinegar (step-by-step).
Using baking soda + warm water.
Things to avoid: harsh chemicals, bleach, and rough scrubbing.
6. Professional Diamond Cleaning
When home methods are not enough.
Ultrasonic cleaning at jewelers.
Steam cleaning options.
Cost and frequency of professional cleaning.
7. Long-Term Care Tips for Clear & Sparkling Diamonds
Regular cleaning routine.
Removing jewelry during workouts, swimming, or applying lotions.
Safe storage (separating diamonds to prevent scratches).
Annual checkups with a jeweler.